webcodr

Telekom VDSL MTU und MSS Clamping für IPv4 und IPv6

To English Version

Wer schon mal in die USA geflogen ist, kennt sicher das Electronic System for Travel Authorization (ESTA). Jeder Fluggast, der in die USA einreist, dort umsteigt oder sie sogar nur überfliegt, muss sich dort anmelden und eine Erlaubnis einholen. Dieser Spaß kostet 14 US-Dollar und wird via pay.gov bezahlt.

Als ich letztes Jahr für eine Reise in USA einen ESTA-Antrag gestellt habe, war pay.gov für mich über die Telekom nicht erreichbar. Via Mobilfunk ging es merkwürdigerweise problemlos, also lag für mich das Problem bei der Telekom. Ein kurzer Austausch mit @telekom_hilft bei Twitter brachte leider keine Besserung, da der Zugriff auf pay.gov für den Support-Mitarbeiter einwandfrei funktionierte.

Ich hatte das Problem nicht groß weiter verfolgt, aber immer wieder mal ausprobiert, ob die Seite erreichbar ist. Bisher war das nie der Fall und es hat mich dann in den letzten Tagen der Ehrgeiz gepackt, endlich die Ursache zu finden.

Nach ein paar Google-Recherchen stand schnell fest, dass die Probleme nur mit IPv6 auftreten. Über IPv4 ging alles einwandfrei. IPv6 kam für mich als Ursache nicht in Frage, weil die DNS-Einträge für pay.gov keinen AAAA Resource Record aufweisen. Da man im Browser den Request nicht im Inspector verfolgen kann, weil die Verbindung bzw. der TLS Handshake gar nicht erst aufgebaut werden konnten, musste Wireshark ran.

Siehe da, der Zugriff erfolgt über IPv6 und die Pakete von pay.gov werden verworfen, weil sie ungültig sind. Nach weiteren Google-Suchen stand fest, dass die Ursachen mit der Maximum Transfer Unit (MTU) bzw. der Maximum Segment Size (MSS) zusammenhängen können. Die MTU-Größe liegt bei DSL-Zugängen bei 1.492 Byte: maximale MTU-Größe abzüglich PPPoE-Header-Größe, also 1.500 Byte - 8 Byte. Zur Berechnung des Schwellenwertes für MSS Clamping, wird von der tatsächlich MTU-Größe zusätzlich die maximale TCP/IP-Header-Größe abzogen: 1.492 Byte - 40 Byte = 1.452 Byte

Ich hatte daher die MTU- und MSS-Werte im EdgeRouter überprüft und sie waren in Ordnung. Nach weiteren Recherchen war klar, dass der EdgeRouter den Wert für MSS Clamping standardmäßig nur für IPv4 einstellt, da der Wert für IPv6 separat eingestellt werden muss. Gesagt, getan. Und? Nichts, der Verbindungsaufbau misslingt nach wie vor.

Blöderweise hatte ich vergessen, dass TCP/IPv6-Header eine maximale Länge von 60 Byte haben können und daher die MSS auf 1.432 Byte gestellt werden muss. Kaum war das erledigt, ließ sich pay.gov problemlos aufrufen.

Dieses Problem betrifft offenbar alle Seiten der US-Regierung unter der TLD .gov, kann aber auch bei anderen Websites auftreten. Es muss nicht zwangsläufig zum Totalausfall führen, da ein Client via ICMP mitteilen kann, dass der Server die Pakete weiter fragmentieren soll. In diesem konkreten Fall funktioniert das aber nicht korrekt, weil die Infrastruktur von pay.gov jegliche ICMP-Pakete ignoriert. Solche Maßnahmen werden oft getroffen, um kritische Systeme vor DDoS-Attacken zu schützen.

MSS Clamping ist eine Art Hack, um dieses Problem anderweitig zu lösen. Paket-Header werden bei der Verarbeitung im Router entsprechend angepasst und so dem Server mitgeteilt, dass er bitte kleinere Pakete als Antwort schicken soll.

So sehr ich die Motivation verstehe, ICMP-Pakete aus Sicherheitsgründen abzuweisen, ist es in diesem Fall eine ungünstige Entscheidung, da IPv6 für seine Funktionen wesentlich stärker von ICMP abhängig ist, als es IPv4 je war.

TL;DR

Sollte jemand merkwürdige Probleme mit nicht aufrufbaren Websites haben oder immer wieder bestimmte Seiten beim ersten Laden sehr lange brauchen, z.B. weil der TLS-Handshake ungewöhnlich viel Zeit beansprucht, kann MSS Clamping Abhilfe schaffen.

Für IPv4 sollte es der EdgeRouter bereits richtig einstellen. Für IPv6 lässt es sich, wie üblich, nur via CLI konfigurieren:

set firewall options mss-clamp6 interface-type pppoe
set firewall options mss-clamp6 mss 1432

Für IPv4 sollte es so aussehen:

ubnt@ubnt# show firewall options mss-clamp
 interface-type pppoe
 mss 1452

Statt dem Interface Type pppoe kann auch all aktiv sein, das betrifft neben PPPoE dann z.B. auch relevanten VPN-Protokolle.

Commit und speichern, Problem gelöst.

Hinweis: Die MSS-Werte beziehen sich nur auf DSL-Verbindungen. Bei allen anderen Verbindungstypen, die kein PPPoE nutzen (z.B. Kabel), muss man die 8 Byte für den PPPoE-Header nicht abziehen und kommt auf auf 1.460 bzw. 1.440 Byte.

Summary in English

Do you have strange loading problems with certain websites? They do not work at all or the first request takes a long time? Then consider MSS Clamping as a possible solution.

In my case, pay.gov was impossible to reach via IPv6. If the server sends too big packets, your system can’t process them correctly. Wireshark will help you to detect such faulty packets.

MSS clamping will alter the packet headers within your router to tell the server the max allowed packet size without the usage of ICMP. It’s kind of a hack, but it works fine and is sometimes the only solution, if the server blocks ICMP, as US government websites do.

In case of IPv4, the EdgeRouter’s wizards did already all the work for you or you can use the MSS clamping GUI wizard after a manual configuration. Unfortunately and as always, there are no ways to configure any IPv6 features via the GUI. You have to rely on the CLI instead:

set firewall options mss-clamp6 interface-type pppoe
set firewall options mss-clamp6 mss 1432

Your IPv4 MSS clamping config should look like this:

ubnt@ubnt# show firewall options mss-clamp
 interface-type pppoe
 mss 1452

Beware: the above mentioned values are for DSL connections using PPPoE and are based on the following calculations:

  • MTU: 1,500 bytes - 8 bytes (max. allowed MTU size - PPPoE header size) = 1,492 bytes
  • MSS: 1,492 bytes (MTU value) - 40 bytes (TCP/IPv4 header size) or 60 bytes (TCP/IPv6 header size) = 1,452 bytes (IPv4) or 1,432 bytes (IPv6)

For other connection types without PPPoE, you don’t have to subtract the PPPoE header size. Cable connections should work fine with 1,460 bytes for IPv4 and respectively 1,440 bytes for IPv6.

Welcome to webcodr.io

webcodr.de will be redirecting all traffic automatically to webcodr.io until 7 april 2018.

If you have bookmarked a post, please adjust the top-level domain of the URL to .io. Thank you!

Interface monitoring with Wireshark on an EdgeRouter

Here is just a neat little trick to use Wireshark for monitoring interfaces on your EdgeRouter. This is incredibly useful for debugging purposes.

The following commands work on macOS or a Linux distribution only.

ssh user@egderouter_ip 'sudo tcpdump -f -i eth0 -w -' | wireshark -k -i -

If you’re monitoring the interface with your SSH connection to the EdgeRouter, you may want to ignore traffic on port 22.

ssh user@egderouter_ip 'sudo tcpdump -f -i eth1 -w - not port 22' | wireshark -k -i -

Update for Windows users

After some fiddling around, I found a working solution for Windows 10 users. You just have to install the SSH client beta and Wireshark for Windows.

ssh user@egderouter_ip "sudo tcpdump -f -i eth0 -w -" | "C:\Program Files\Wireshark\Wireshark.exe" -k -i -

Troubleshooting advice:

  • The Windows SSH client will only work on command shells with admin privileges.
  • Use only double quotes. The Windows command line doesn’t like single quotes as well as a shell on unixoid operating systems.
  • Adjust the path to Wireshark if it’s not installed in the default directory.
  • CTRL + C or CTRL + X will not work to terminate the SSC connection. You have to close the window instead.

nginx Reverse Proxy on Raspberry Pi with Let's Encrypt

Another weekend, another guide. This time I will show you, how to setup a reverse proxy with nginx on a Raspberry Pi and secure the connection with a certificate from Let’s Encrypt.

NOTICE OF CAUTION BEGIN

Your Raspberry Pi will be exposed to the internet on port 80 for HTTP and port 443 for HTTPS/TLS. A potential attacker could have access to your network. Please make sure, that you keep yourself up to date on security issues and install updates regularly.

To secure your network, I recommend an isolated VLAN for your Pi and the web servers.

If this makes you uncomfortable, please re-consider running web servers within your network, that can be accessed from outside.

NOTICE OF CAUTION END

Still here? Okay, you have been warned. Let’s go.

Please make sure, to forward port 80 and 443 from your router to the Raspberry Pi.

Install nginx and Certbot

This guide assumes that you’re running the latest version of Raspian on your Pi. It’s based on Debian Stretch. If you’re using an older version based Jessie or even Wheezy, please consider a dist upgrade. This is not without risk, so back-up your current installation!

If you’re already running a web server on your Pi, you should disable it. Otherwise nginx will not be able to use port 80 and 443. If you need that other web server, you should configure it to run on other ports and use nginx to forward the connections.

Now, to the installation:

sudo apt-get update
sudo apt-get install nginx-full certbot -y

The nginx service will automatically start after APT finished.

Issue a certificate

In order to create a certificate, Certbot will need access to port 80, but that’s no problem. Look at the following command:

sudo certbot certonly --authenticator standalone -d example.com --pre-hook "service nginx stop" --post-hook "service nginx start"

This tells certbot to issue a certificate for example.com by using a standalone web server to validate the domain for the Let’s Encrypt service. In order to run the server, you have to shutdown nginx until certbot is finished. The pre hook and post hook parameters will help you with that.

After the certificate is successfully issued, your new certificate and all other necessary files will be available here: /etc/letsencrypt/live/example.com

Configure nginx

Don’t like vim? Just use whatever editor you prefer instead.

Add a new site config to nginx:

sudo vim /etc/nginx/sites-enabled/example.com

All files in /etc/nginx/sites-enabled/ will be automatically used by nginx.

Here is a config for example.com, that will be forwarded to 10.0.0.2.

Please adjust it to your needs and paste/save it.

server {
  listen 80;
  server_name example.com;

  location / {
    proxy_pass http://10.0.0.2:80;
  }
}

server {
  listen 443 ssl;
  server_name example.com;
  ssl on;

  ssl_certificate /etc/letsencrypt/live/example.com/fullchain.pem; 
  ssl_certificate_key /etc/letsencrypt/live/example.com/privkey.pem;
  ssl_session_timeout 1d;
  ssl_session_cache shared:SSL:50m;
  ssl_session_tickets off;
  ssl_protocols TLSv1.1 TLSv1.2;
  ssl_ciphers 'ECDHE-RSA-AES128-GCM-SHA256:ECDHE-ECDSA-AES128-GCM-SHA256:ECDHE-RSA-AES256-GCM-SHA384:ECDHE-ECDSA-AES256-GCM-SHA384:DHE-RSA-AES128-GCM-SHA256:DHE-DSS-AES128-GCM-SHA256:kEDH+AESGCM:ECDHE-RSA-AES128-SHA256:ECDHE-ECDSA-AES128-SHA256:ECDHE-RSA-AES128-SHA:ECDHE-ECDSA-AES128-SHA:ECDHE-RSA-AES256-SHA384:ECDHE-ECDSA-AES256-SHA384:ECDHE-RSA-AES256-SHA:ECDHE-ECDSA-AES256-SHA:DHE-RSA-AES128-SHA256:DHE-RSA-AES128-SHA:DHE-DSS-AES128-SHA256:DHE-RSA-AES256-SHA256:DHE-DSS-AES256-SHA:DHE-RSA-AES256-SHA:!aNULL:!eNULL:!EXPORT:!DES:!RC4:!3DES:!MD5:!PSK';
  ssl_prefer_server_ciphers on;
  ssl_stapling on;
  ssl_stapling_verify on;
  ssl_trusted_certificate /etc/letsencrypt/live/example.com/chain.pem; 

  location / {
    proxy_pass https://10.0.0.2:443;
  }
}

To test your config, use the following command:

sudo nginx -t

The validator will tell you, if anything is wrong and why it’s not working.

No errors? Great, just restart nginx and your reverse proxy is working.

sudo service nginx restart

Certificate auto-renewal

The certbot certificate renewal will renew all certificates you created with cerbot.

Checking the renewal process:

sudo certbot renew --dry-run --pre-hook "service nginx stop" --post-hook "service nginx start"

The parameter --dry-run allows to test the renewal without actually replacing the certificates.

In order to renew the certificates automatically, open crontab for root:

sudo crontab -e

Add the following cron job and save.

0 0 1 * * sudo certbot renew --pre-hook "service nginx stop" --post-hook "service nginx start"

And you’re done. From now on, your certificates will be renewed every month automatically.

More domains? No problem, just issue the certificate and add another site config.

Telekom EntertainTV mit Ubiquiti EdgeRouter X

Da bei Sky Deutschland nun auch noch die Formel 1 entfällt und zusätzlich in den letzten Jahren diverse Rechte, z.B. die Premier League, auch abhanden gekommen sind, habe ich mich dazu entschlossen auf EntertainTV von der Telekom umzusteigen.

In diesem Post erkläre ich meine EdgeRouter- bzw. Netzwerk-Konfiguration, da ein IPTV-System wie EntertainTV besondere Anforderungen stellt. Damit IPTV überhaupt funktionieren kann, muss die Telekom Multicasts verwenden. Im Gegensatz zu DVB-C oder DVB-S2, wird hier nicht jedem Kunden alles geschickt, um sich auszusuchen, was man anschaut. Man bekommt nur das geliefert, was auch tatsächlich angesehen wird. Multicasts erlauben hier die effiziente Verteilung von Paketen, ohne das eigene Netz zu überlasten.

Damit Multicasts funktionieren, muss auch die lokale Netzwerk-Hardware mitspielen. Darum empfiehlt die Telekom u.A. ihre IPTV-Receiver direkt mit dem Router zu verbinden. Das ist sicher kein Problem, wenn der Telefonanschluss im Wohnzimmer ist, aber gerade in älteren Wohnungen, ist das eher selten der Fall und Kabelkanäle sind auch rar. Sobald Switches oder Access Points ins Spiel kommen, müssen die Geräte das Internet Group Multicast Protocol in Version 3 (IGMPv3) unterstützen. Wenn sie das nicht tun, wird aus dem Multicast ein Broadcast an alle Geräte ins Netzwerk. Bei einem HD-Stream mit 10 Mbit/s und 20 Geräten im Netzwerk, würde man so 200 Mbit/s Last erzeugen. Das mag im LAN noch evtl. verschmerzbar sein, aber in einem WLAN sieht die Sache anders aus. Leider unterstützt insbesondere Consumer-Netzwerk-Hardware oft kein IGMP oder nur eine ältere Version, die ebenfalls ins Broadcasts resultiert.

Eine wirklich günstige Lösung gibt’s dafür leider nicht. Man kann sich entweder mit entsprechend IGMP-fähiger Hardware helfen oder mit einem separaten Netz über ein VLAN. Dummerweise unterstützten Consumer-Geräte meist auch keine VLANs.

Ohne Managed Switches, die IGMPv3 und/oder VLANs unterstützen, kommt man hier leider nicht weit. Mein Netzwerk besteht daher nur noch aus Netzwerk-Hardware von Ubiquiti: ein EdgeRouter X, drei UniFi Switches und zwei UniFi Access Points.

Konfiguration

Folgende Punkte beschreiben die Konfiguration der UniFi-Hardware und des EdgeRouters. Wie immer gilt: ich verwende einen EdgeRouter X, aber es sollte auch problemlos mit jedem anderen EdgeRouter funktionieren.

UniFi

Der einfache Teil vorweg: für die UniFi-Geräte reicht es, IGMP Snooping in den Einstellungen unter Networks bzw. Wireless Networks für das jeweilige Netz zu aktivieren und die Geräte neu zu provisionieren.

Falls jemand ein UniFi Security Gateway als Router verwenden sollte, müssen noch weitere Einstellungen im CLI des Controllers vorgenommen werden, damit der IGMP Proxy läuft. Eine Anleitung dazu gibt’s hier.

EdgeRouter

Wie auch für das USG gilt, dass auf dem EdgeRouter ein IGMP Proxy laufen muss. Das verlangt Einstellungen, die nur über das CLI erfolgen können. Der Einfachheit halber, werde ich auch die entsprechenden Firewall-Regeln über das CLI beschreiben, da man die einfach kopieren und nach seinen Wünschen anpassen kann – im Gegensatz zu einer Screenshot-Orgie.

Firewall

Grundsätzlich sollte jeder EdgeRouter min. zwei Firewall-Rulesets haben, in und local. Bei mir heißen sie WAN_IN sowie WAN_LOCAL und werden daher auch in diesem Beispiel verwendet. Das Modem hängt an eth0 und die Verbindung wird über eth1 ins restliche Netzwerk verteilt.

Die folgenden Firewall-Regeln richten sich an Nutzer von EntertainTV bzw. Telekom-Kunden im BNG. Wer noch nicht im BNG ist bzw. das alte Entertain nutzt, muss teilweise andere IP-Adressen freigeben und dazu VLAN 8 verwenden, weil im alten Netz die Internetverbindung (VLAN 7) und Entertain (VLAN 8) getrennt laufen, siehe den Beitrag von TauSys.

Als erstes müssten IGMP und Multicast UDP-Pakete für WAN_IN erlaubt werden:

set firewall name WAN_IN rule 1 action accept
set firewall name WAN_IN rule 1 description 'Allow IGMP'
set firewall name WAN_IN rule 1 log disable
set firewall name WAN_IN rule 1 protocol igmp
set firewall name WAN_IN rule 2 description 'Allow IPTV Multicast UDP'
set firewall name WAN_IN rule 2 destination address 224.0.0.0/4
set firewall name WAN_IN rule 2 log disable
set firewall name WAN_IN rule 2 protocol udp

Anschließend werden Multicast UDP-Pakete lokal für WAN_LOCAL erlaubt:

set firewall name WAN_LOCAL rule 1 action accept
set firewall name WAN_LOCAL rule 1 description 'Allow Multicast'
set firewall name WAN_LOCAL rule 1 destination address 224.0.0.0/4
set firewall name WAN_LOCAL rule 1 log disable
set firewall name WAN_LOCAL rule 1 protocol all

Bitte beachtet, dass die Reihenfolge der Regeln entsprechend passt und die neuen Regeln immer vor der Drop-Regel stehen, die nicht erlaubte Pakete entsorgen soll.

Was hat es mit dem Netz 224.0.0.0/4 auf sich? Sehr vereinfacht gesagt: ein Bereich bestimmter IPv4-Adressen, die für Multicast-Verwaltung genutzt werden können.

IGMP Proxy

Der schon mehrfach genannte IGMP Proxy ist ein vergleichsweise simples Tool, um IGMP-Pakete an die entsprechenden Stellen weiterzuleiten. Ohnehin würden die Pakete im Router quasi hängenbleiben.

set protocols igmp-proxy interface eth1 alt-subnet 0.0.0.0/0
set protocols igmp-proxy interface eth1 role downstream
set protocols igmp-proxy interface eth1 threshold 1
set protocols igmp-proxy interface eth1 whitelist 232.0.0.0/16
set protocols igmp-proxy interface pppoe0 alt-subnet 0.0.0.0/0
set protocols igmp-proxy interface pppoe0 role upstream
set protocols igmp-proxy interface pppoe0 threshold 1

Das Beispiel geht davon aus, dass die restlichen Geräte über eth1 am EgdeRouter hängen. Falls jemand ein VLAN verwendet, wie ich es im vorherigen Post beschrieben habe, muss an das Interface noch die VLAN-ID angehängt werden, z.B. eth1.10.

Entertain bzw. EntertainTV funktionieren aktuell nur via IPv4, daher ist eine IPv6-Konfiguration nicht notwendig.

Das war’s eigentlich schon. Ihr müsst nur noch einen Commit machen und speichern. Der IGMP Proxy sollte damit automatisch starten.

Ich hatte die ganze Konfiguration bereits anhand diverser Blog- und Foren-Posts im Vorraus gemacht und erstaunlicherweise hat sie auf Anhieb funktioniert. Es treten keinerlei Broadcast-Probleme auf.

Falls Ihr den Verdacht habt, das lässt sich mit Wireshark sehr einfach überprüfen: einfach die aktive Netzwerk-Schnittstelle abfragen und auf Broadcasts bzw. ungewöhnlich viele UDP-Pakete achten, die von den EntertainTV-IP-Adressen kommen.

EdgeRouter VLAN isolation

In this post I will show you, how to create a VLAN with your EdgeRouter and how to fully isolate it from all your other networks.

The following configuration shows my VLAN setup for IPTV services, since the receivers do not need access to the other networks and an isolated network for IPTV can avoid trouble with multicast/IGMP. You don’t use IPTV? No problem, you could use the config to create a guest network or for other untrusted devices.

I’m using an EdgeRouter X, but this configuration will work on any other EdgeRouter. The general approach should even work on a UniFi router like the USG.

Update (15. February 2018)

I have completely rewritten the firewall configuration guide, since the first version had a substantial flaw: it will cut the access from the VLAN to your LAN, but the VLAN can connect to all router services. So, someone could open an SSH connection to your EdgeRouter and that’s bad.

If you have already followed the old guide, please delete the ruleset and use the new guide to create a proper firewall config.

Network Setup

  • 10.0.0.0/24: home network on eth1
  • 192.168.1.0/24: management LAN for my DSL modem on eth0
  • 10.0.1.0/24: eth2, eth3 and eth4 as switched ports on the EdgeRouter X

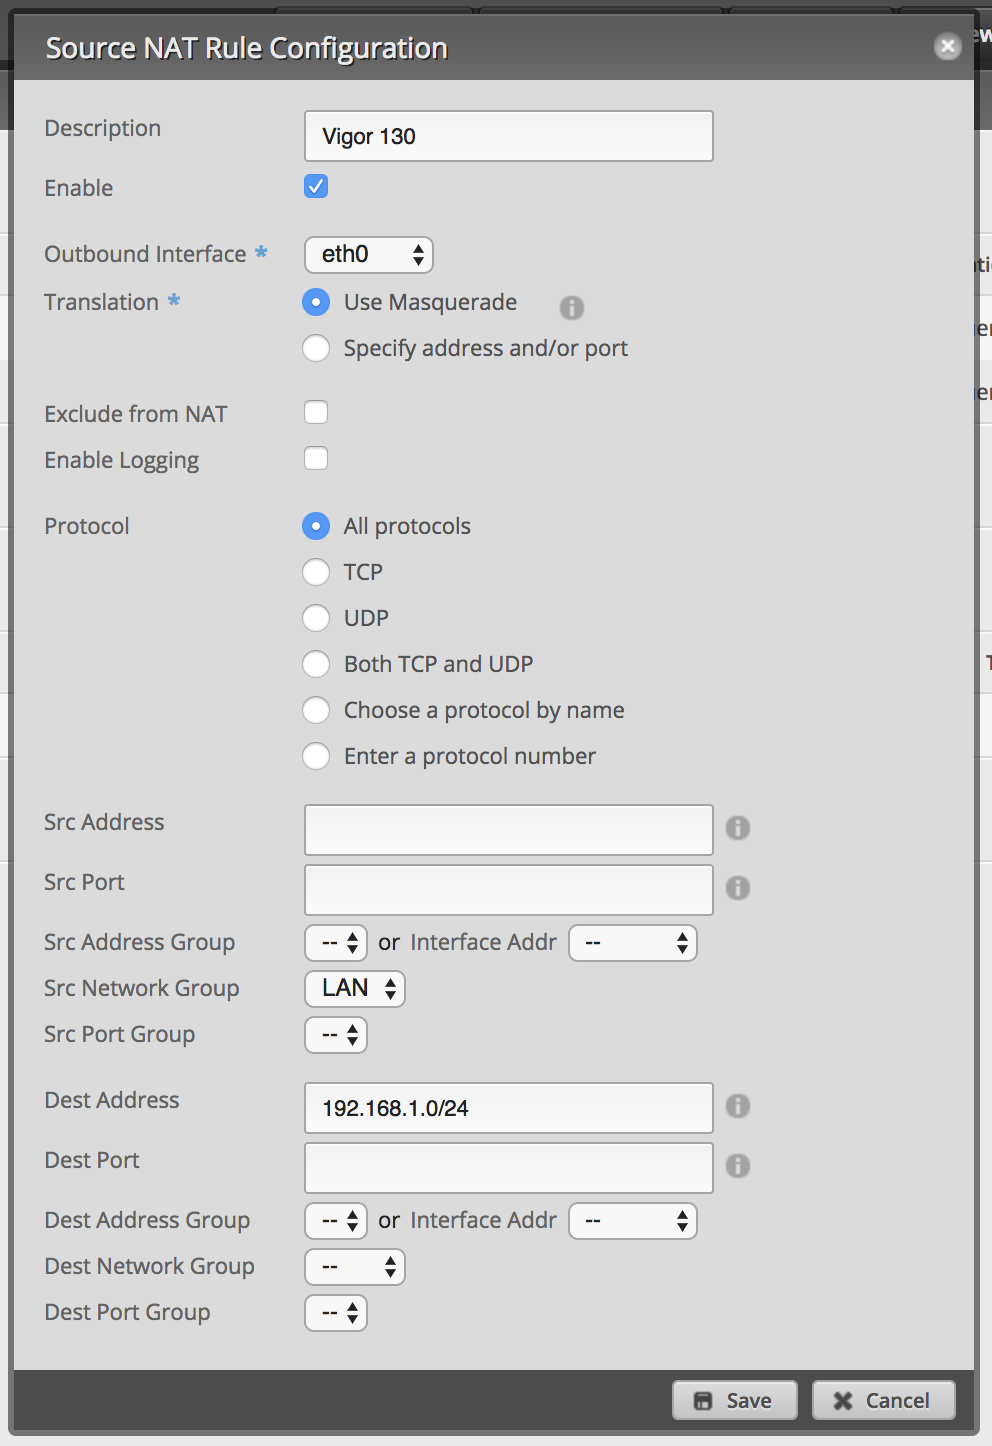
My management LAN is connected to the other networks via a custom NAT rule.

The main LAN consists of the three UniFi switches (US-8 and US-8 POE) and two UniFi access points (AP AC Lite). UniFi switches are fully supporting VLANs, so I can terminate a VLAN to any switch port within the network.

Why private class A networks? Well, why not? And I like short IP addresses.

But the management LAN is a private class C network? Yeah, I’m leaving the modem on it’s default network configuration to avoid trouble, if I ever have to reset it’s config. I like to experiment with other firmware versions. Currently I’m trying a firmware for australian ISPs. So far it’s working great and it disables some the VDSL error corrections from my ISP that can cause higher latencies.

Here we go

The IPTV VLAN will be on eth1 with VLAN ID 10 and will be terminated on a UniFi switch in the living room. If you need a guide, how to setup a VLAN on a UniFi switch and to assign it to a switch port, just click here.

Create the VLAN

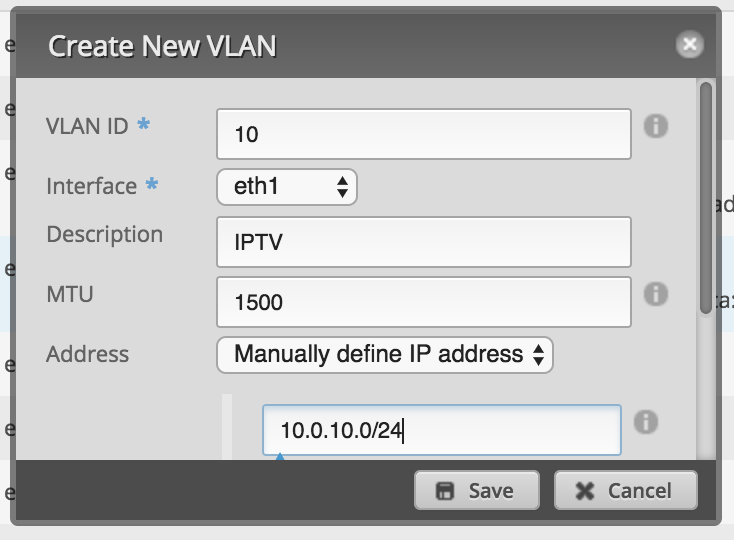
  1. Go to the dashboard of your EdgeRouter, click on Add Interface and select VLAN:

    Create VLAN

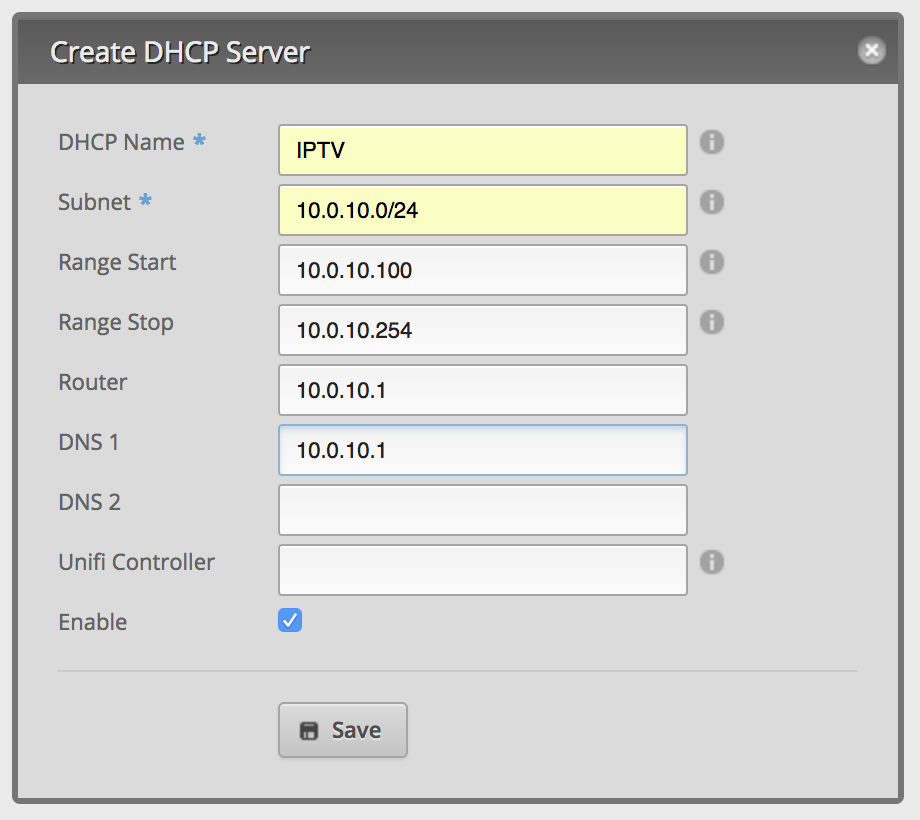
  2. Go to section SERVICES and click Add DHCP server:

    Create VLAN DHCP server

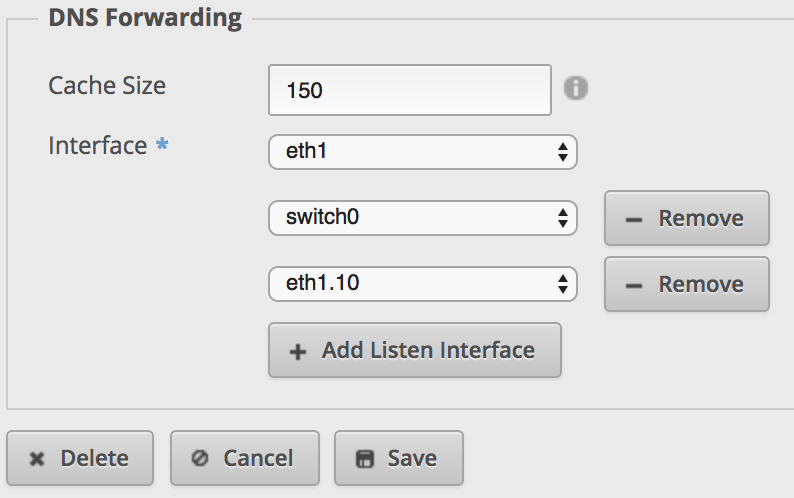
  3. Stay in SERVICES, go to the tab DNS, Add Listen interface and choose the interface of your VLAN:

    Create VLAN DNS forwarding

VLAN 10 is now ready to use, but it’s not isolated from the other networks. The EdgeRouter’s job is to route between networks. A device on VLAN 10 could access the LAN, your NAS for example.

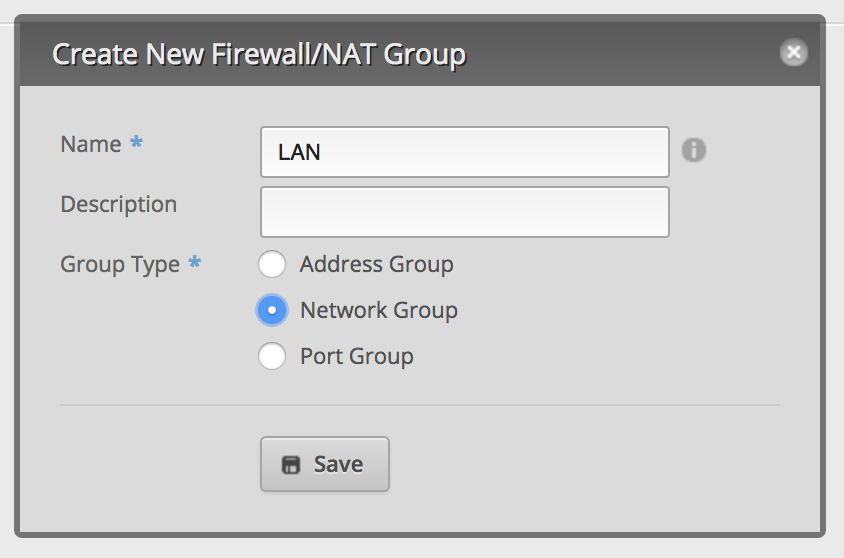
Create network group

  1. Go to FIREWALL/NAT, then to Firewall/NAT Groups and create a new network group:
![Create Network Group](/images/edgerouter-vlan-isolation/create_network_group.png)
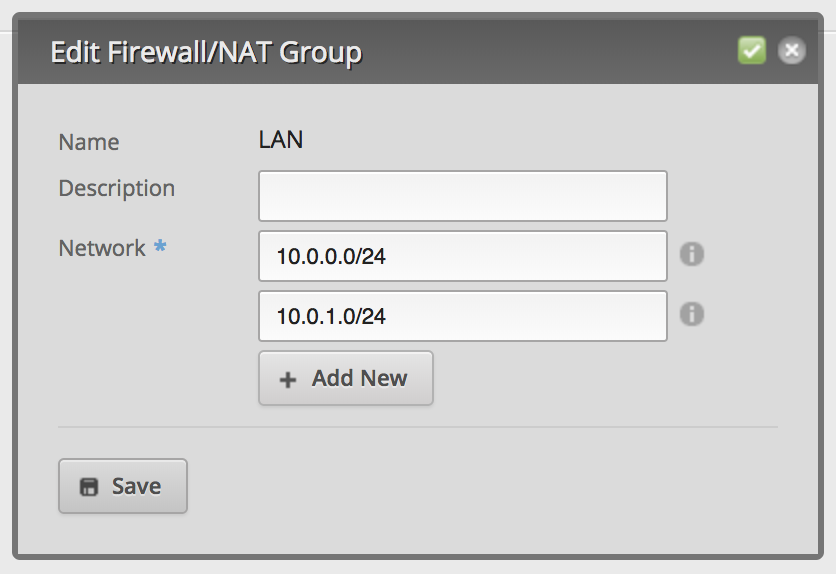
  1. Edit the new network group and add all networks except the VLAN:

    Create Network Group Add Networks

A quick guide to firewall directions

Before you create the firewall rulesets, you should know and understand the firewall ruleset directions:

  • IN: traffic entering the router from an interface
  • OUT: traffic exiting the router to an interface
  • LOCAL: traffic entering the router and destined to router itself (internal services, like DNS, DHCP, VPN etc.)

I will also provide a short explanation for each firewall ruleset and its direction.

If you’re having trouble to understand the directions, there is a very helpful diagram in the Ubiquiti forums.

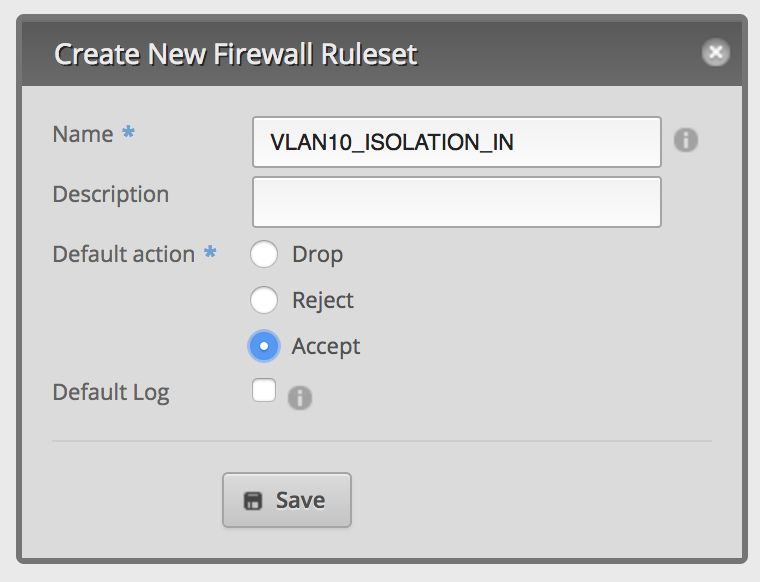
Create firewall ruleset VLAN10_ISOLATION_IN

The following firewall ruleset blocks traffic into all networks of your network group, but will allow already established connections.

Direction IN means any traffic from eth1.10 to any other of your EdgeRouter’s interfaces.

  1. Go to Firewall Policies and click Add Ruleset:

    Create Firewall Ruleset IN

  2. Edit the new ruleset and setup the interfaces:

    Create Firewall Ruleset IN Interfaces

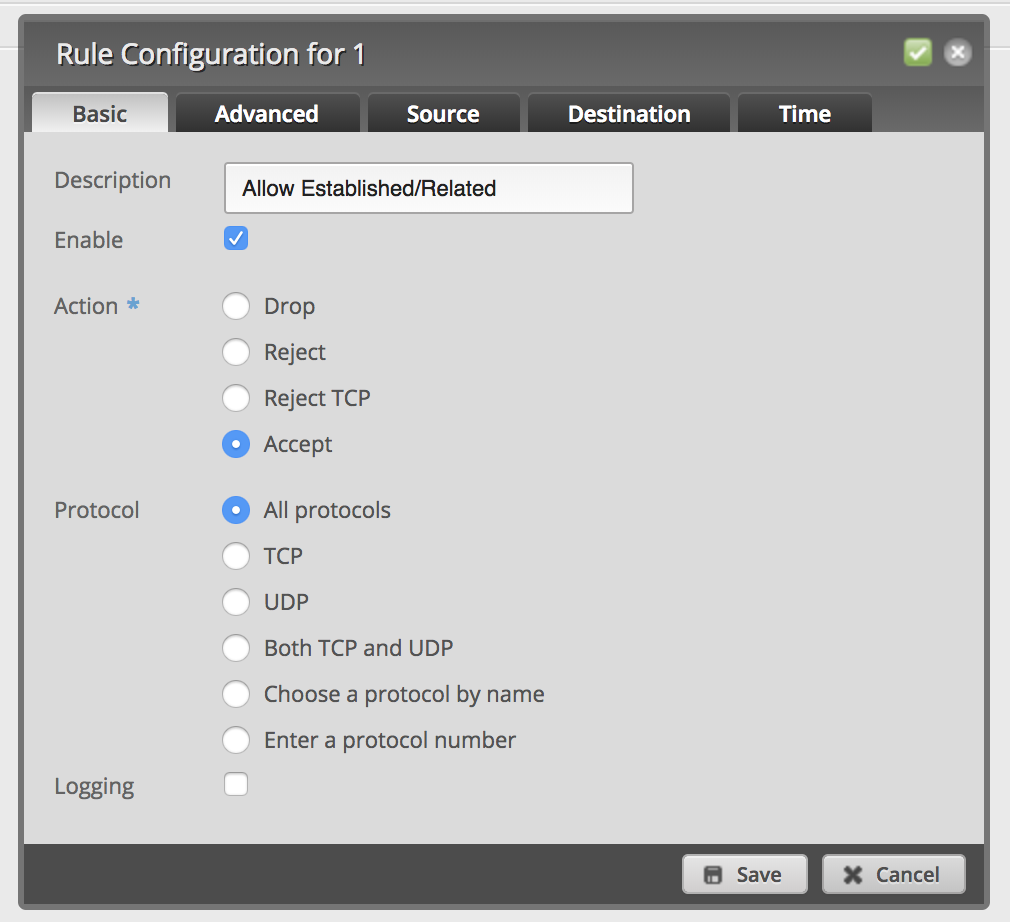
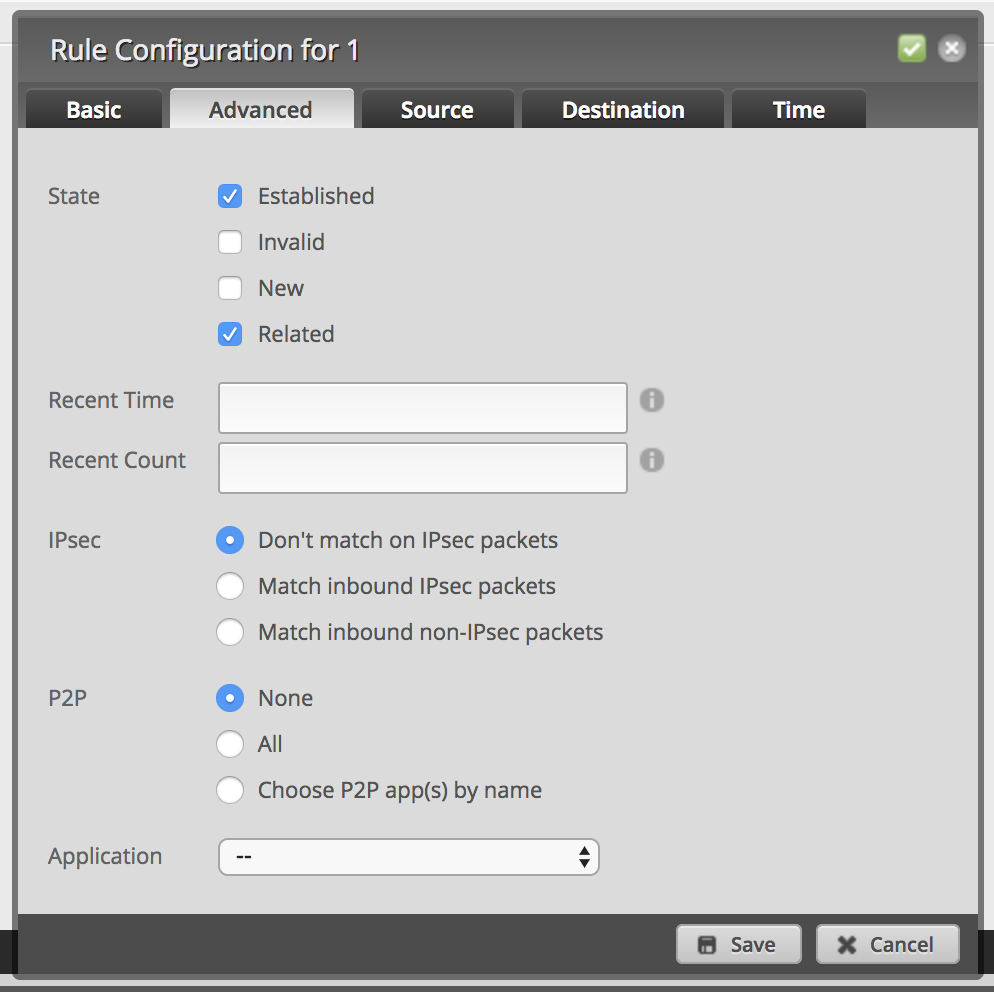
  3. Add a new firewall rule to allow established and related packets:

    Create Firewall IN Rule 1 Basic

    Create Firewall IN Rule 1 Advanced

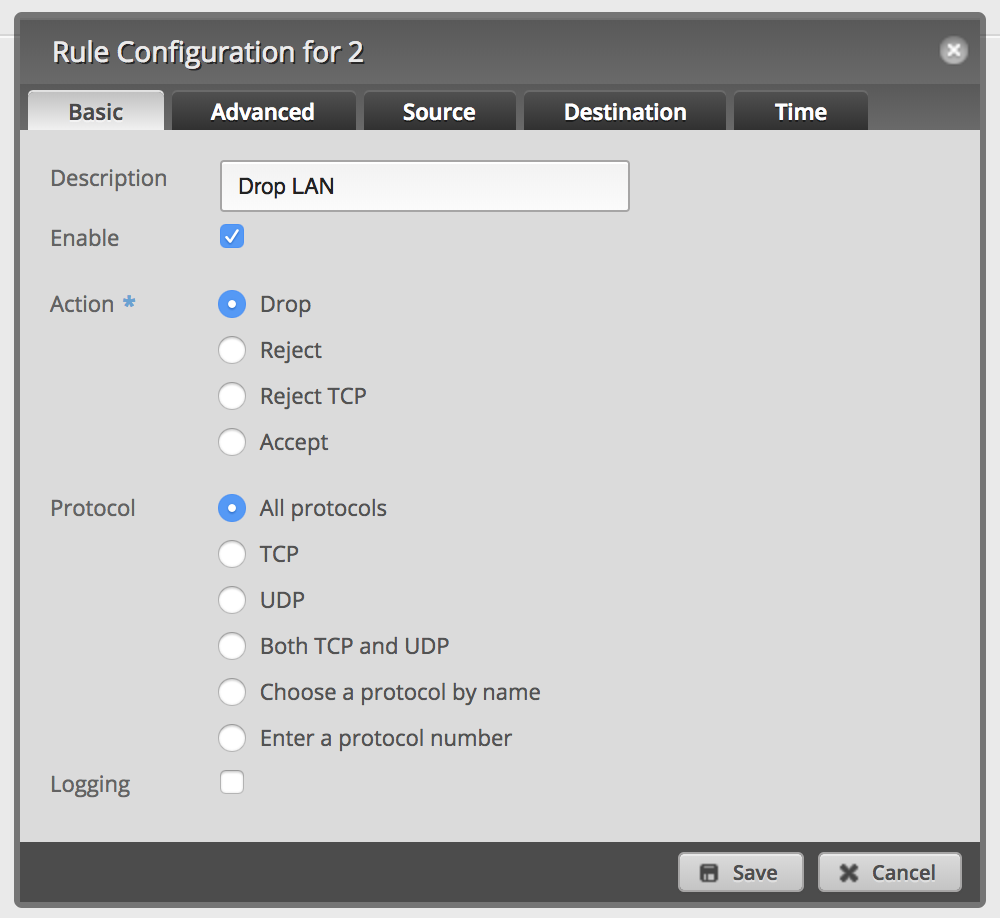
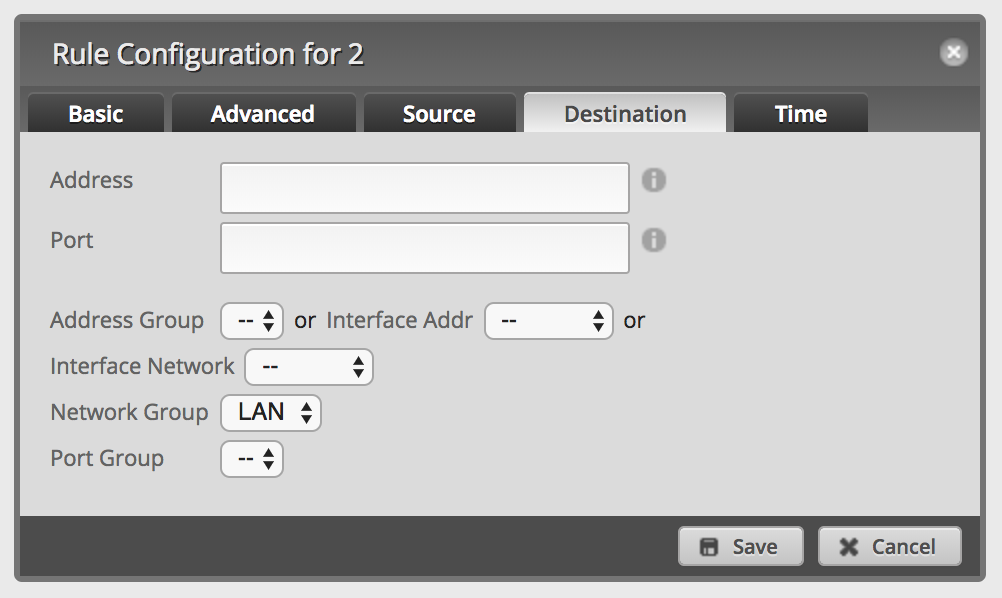
  4. Add a new firewall rule to drop packets into network group LAN:

![Create Firewall IN Rule 2 Basic](/images/edgerouter-vlan-isolation/create_firewall_ruleset_in_rule2_basic.png)

![Create Firewall IN Rule 2 Advanced](/images/edgerouter-vlan-isolation/create_firewall_ruleset_in_rule2_dest.png)
  1. Your firewall ruleset should look like this:
![Create Firewall IN Rules](/images/edgerouter-vlan-isolation/create_firewall_ruleset_in_rules.png)

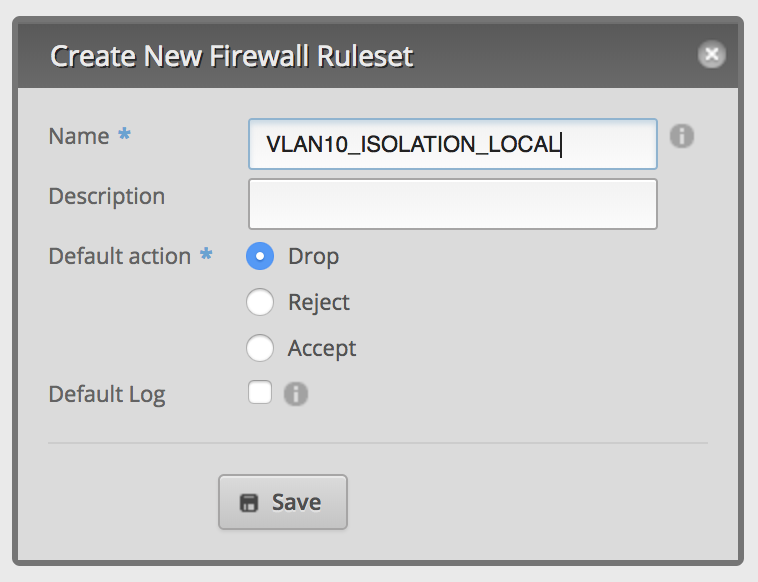
Create firewall ruleset VLAN10_ISOLATION_LOCAL

This ruleset will block any traffic to your EdgeRouters services, with the exception of DNS and DHCP.

Direction LOCAL means any traffic from eth1.10 directly to your EdgeRouter and its services.

  1. Create another firewall ruleset like VLAN10_ISOLATION_IN:

    Create Firewall Ruleset LOCAL

  2. Edit the new ruleset and setup the interfaces:

    Create Firewall Ruleset LOCAL Interfaces

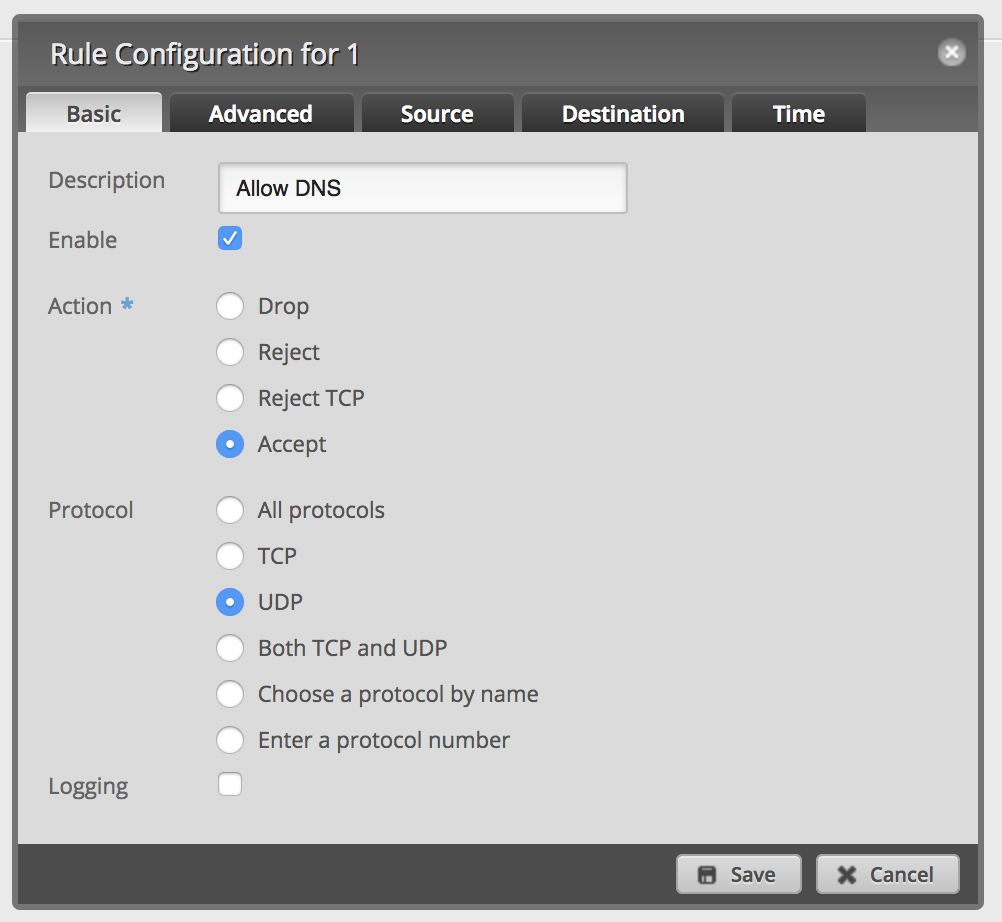
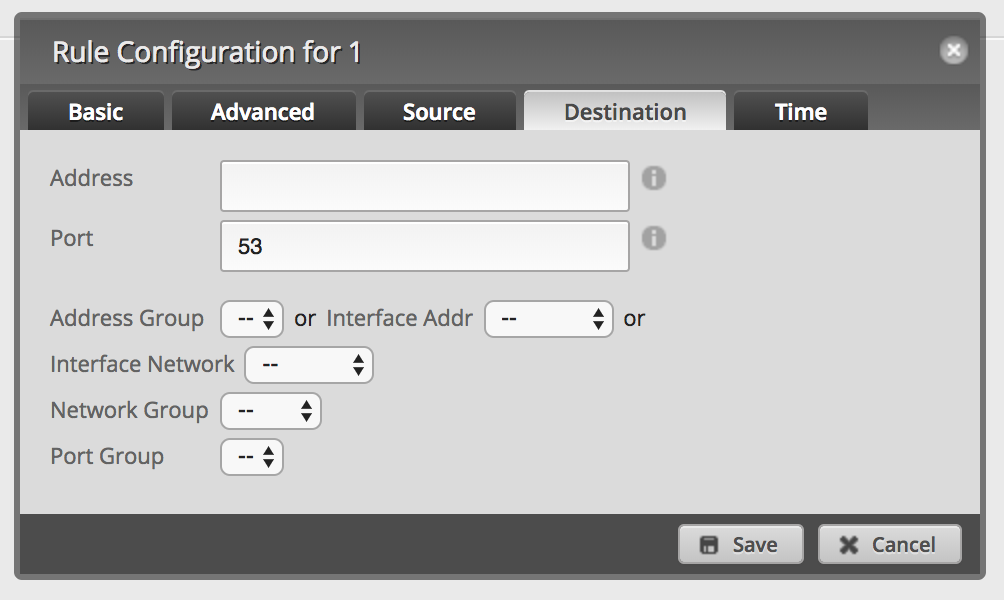
  3. Add a new firewall rule to allow DNS:

    Create Firewall LOCAL Rule 1 Basic

    Create Firewall LOCAL Rule 1 Advanced

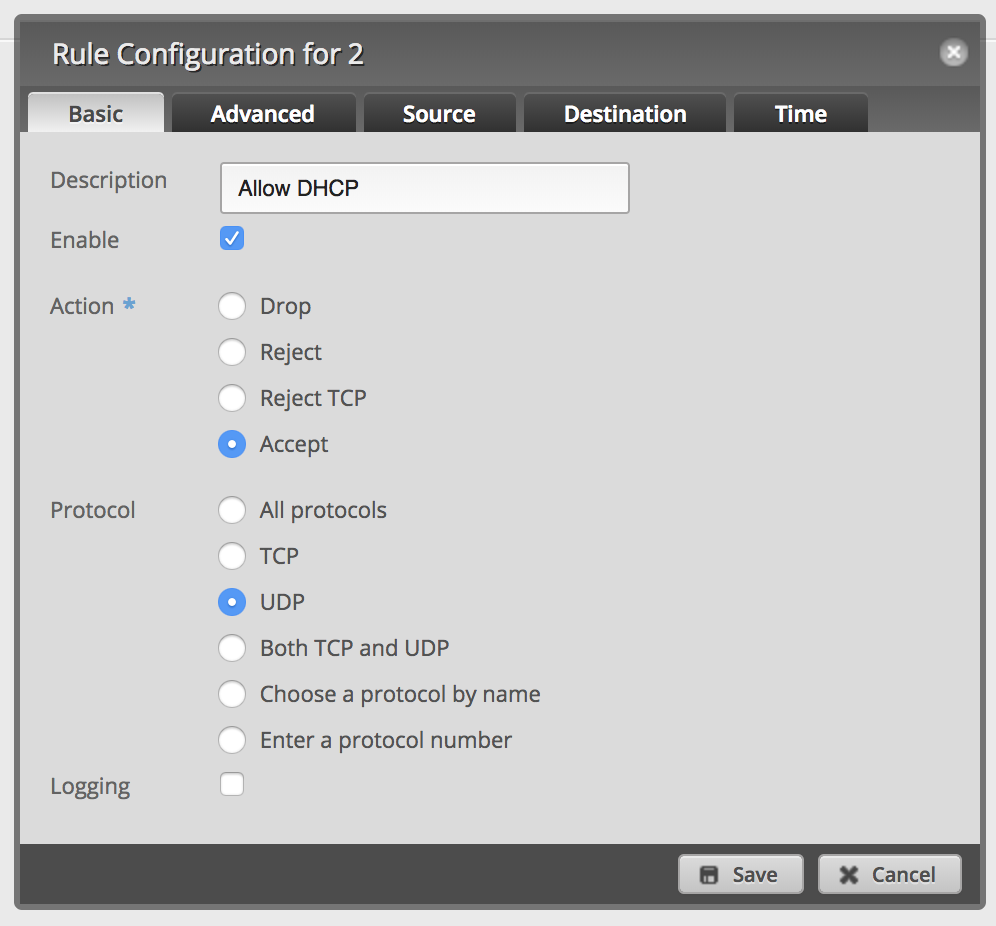
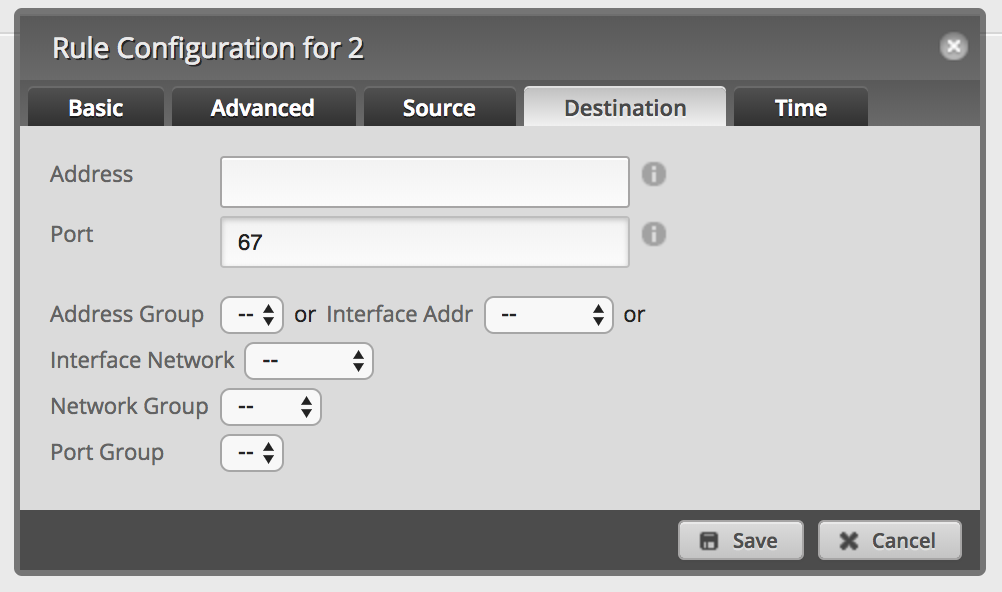
  4. Add a new firewall rule to allow DHCP:

![Create Firewall LOCAL Rule 2 Basic](/images/edgerouter-vlan-isolation/create_firewall_ruleset_local_rule2_basic.png)

![Create Firewall LOCAL Rule 2 Advanced](/images/edgerouter-vlan-isolation/create_firewall_ruleset_local_rule2_dest.png)
  1. Your firewall ruleset should look like this:
![Create Firewall IN Rules](/images/edgerouter-vlan-isolation/create_firewall_ruleset_local_rules.png)

Optional: assign network groups to custom NAT rules

Edit NAT rule configuration

If you’re using custom NAT rules, you have to add your new network group to the rules to exclude the VLAN. Firewall rules alone will not isolate any networks from custom NAT rules.

That’s it. VLAN 10 is now fully isolated from all other networks. The firewall will drop all packages from eth.10 to the network group and my custom NAT rule will only work from networks of the group.

Synology DSM and Let's Encrypt Trouble

This is just a quick note to all with problems to create Let’s encrypt certificates with Synology DSM.

I had trouble for months with this. DSM returnd always that port 80 is closed, but my EdgeRouter config said otherwise and content from the Synology web server itself was accessible via port 80. So, no ISP issue either.

After some research, I used acme.sh with a DNS-based challenge on macOS and imported the certificate. Well, it works, but I wanted a real solution.

Again, after a little more than some reseach, I found a valuable hint. In dual-stack configurations with both, real IPv4 and IPv6 addresses, the Synology Let’s Encrypt client uses IPv6 for the challenge. Of course port 80 was only opened for IPv4 connections. I opened the port and … it didn’t work. I’m not sure why, since I am no master of the CLI-based configuration of a router.

Next idea: turn off IPv6 in Synology’s dynamic DNS service. Well, turns out, you can’t configure which protocols the services will use. Turning off IPv6 in the network settings also didn’t help.

The solution: use a dynamic DNS service that can configure the protocols or does not have IPv6 support. After some fiddling around with the list of supported services in DSM, I decided to use NoIP. And? It works, finally!

Why NoIP? Well, some of the supported services websites seemed ancient and frankly, I don’t want to pay money just for creating a new certifacte every 90 days.

Dear Synology devs

If you read this, please consider adding the DNS challenge option. This was proposed multiple times in the Synology forums since you introduced Let’s Encrypt support and it would help in such situations, where port 80 cannot be accessed due to firewall or ISP issues like dual-stack lite. Thank you.

TL;DR

If you’re having trouble with Synology DSM, Let’s Encrypt and port 80 error messages and you’re using a dual-stack connection like me, turn off IPv6 for your dynamic DNS service or try to open your firewall for IPv6 port 80.

About

Topics: programming in general, Kotlin, Rust, developer productivity (better shells, tmux, nvim etc.), Apple products, mechanical keyboards, some networking stuff (UBNT Edge and Unifi) and some older posts about Ruby and JS.

Webcodr on GitHub

Real-world Node.js Performance Improvements

I just updated from Node.js 8.2.1 to 8.4.0 within my current project. The update to V8 6.0 really shines as I noticed some major real-world performance improvements.

So I decided to do some tests with the above mentioned versions and the latest LTS version, 6.11.2.

Testing methodology

The Webpack build contains the following tasks:

  • Building of two stylesheets with SASS and Autoprefixer
  • Transpiling with Babel of a large AngularJS app written in ES2015
  • Copying images and some other static files
  • Chunking into vendor.js and application.js

Each test ran nine times for each Node.js version.

The tests were conducted in dev mode (no minification, no uglification) with a Debian-based Docker container on Windows 10 Pro with HyperV.

Hardware

  • Core i7-7700K (the Docker container had access to all cores)
  • 16 GB RAM (8 GB for the Docker container)
  • PCIe SSD

As you can see, the system has more than enough power and is significantly faster than my MacBook. Docker on HyperV is incredibly fast and a joy to work with.

Results

Node.js performance benckmark

The improvement between version 8.2.1 and 8.4.0 is a bummer. V8 6.0
does a great job. Node.js 6 used Crankshaft as JIT, Node 8.0 to 8.2 used a combinaton of Crankshaft and Turbofan (V8 5.9). As of version 8.3.0 Node.js utilizes only Turbofan with V8 6.0.

About 10% improvement with a minor version is a really big step and I’m really looking forward to the next V8 versions and even more power.

Ubiquiti EdgeRouter X vs. MikroTik hEX

Da ich auch mal Router testen wollte und den EdgeRouter X (ER-X) eh schon besitze, habe ich mir ein vergleichbares Gerät von MikroTik besorgt, den hEX bzw. den RB350Gr3 (dritte Generation des hEX).

MikroTik ist ein Netzwerkausrüster aus Lettland. Wie Ubiquiti bieten sie professionelle Netzwerk-Hard- und Software zu bezahlbaren Preisen an. Man kann sogar Einzelteile wie Boards, Ports, Gehäuse usw. einzeln kaufen und sich damit seinen Traum-Router zusammenbauen.

Die Kontrahenten

Sie könnten zwar von außen nicht unterschiedlicher sein, ihre inneren Werte sind jedoch sehr vergleichbar. Beide bieten fünf Gigabit-Ports und können an Port 1 über 24 V Passive PoE mit Strom versorgt werden. Außerdem nutzen beide den gleichen SoC von MediaTek und damit die gleiche CPU: einen 880 MHz MIPS Dual Core (4 Threads). Preislich liegen sie mit ca. 55 - 60 Euro natürlich auch gleich auf.

Ubiquiti EdgeRouter X

Ubiquiti EdgeRouter X

Putzig, was? Der ER-X ist wirklich klein, aber davon sollte man sich nicht täuschen lassen. Er bietet fünf völlig frei konfigurierbare Gigabit-Ports. Einmal WAN, einmal LAN und drei Switch-Ports mit separatem Netz? Kein Problem. Zweimal WAN mit automatischem Fail Over? Klar. Reiner Switch-Betrieb? Und ob, auch wenn er alleine dafür zu schade ist.

Auf dem ER-X läuft eine Linux-Distribution namens EdgeOS, die auch auf allen weiteren EdgeMAX-Geräten von Ubiquiti eingesetzt wird. Auf Einschränkungen im Vergleich zu den größeren Brüdern verzichetet man dankenswerterweise.

EdgeOS bietet ein recht umfangreiches Web-Interface mit dem sich viele Aufgaben schnell und einfach erledigen lassen. Für die wichtigsten Standard-Anwendungsfälle stehen Assistenten (Wizards) bereit. Ein simples Setup für WAN mit vier LAN-Ports als Switch und PPPoE inkl. Firewall ist damit in einer Minute erledigt. IPv6 wird leider bisher vom Web-Interface kaum unterstützt, bis auf eine Option in den Wizards für ein Standard-Setup mit Firewall, das aber ohne weitere manuelle Konfiguration nicht funktioniert, kann es nur noch IPv6-Adressen für die Interfaces anzeigen.

Alles weitere inkl. der tiefgreifenderen Konfigurationsmöglichkeiten muss über das CLI erledigt werden. Klingt nun schlimmer als es ist. EdgeOS basiert auf Vyatta, einer Linux-Distribution speziell für Netzwerkgeräte. Vyatta hat ein übersichtliches, recht einfach zu erlernendes Interface. Änderungen werden nicht sofort aktiv, erst nach dem man den Befehl commit abschickt werden sie aktiv aber noch nicht gespeichert. Sollte man sich also z.B. mal bei einer Firewall-Änderung aussperren, reicht ein Neustart des ER-X und alles läuft wie zuvor. Um zu speichern wird der Befehl save genutzt.

Man muss also keine Angst vor dem CLI haben. Kaputt machen kann man nichts, sofern man nicht gleich jede Änderung speichert.

Zusätzlich bietet der EdgeRouter X via CLI zuschaltbare Hardware-Beschleunigung für NAT und IPsec (aktuell Beta). Lt. eines Mitarbeiters auf Reddit überlegt Ubiquiti derzeit außerdem Deep Packet Inspection (DPI) in Hardware zu unterstützen – da fehlt wohl noch ein passender Treiber. Damit wäre er fast auf dem Niveau des nächst größeren Bruders, dem EdgeRouter Lite (ca. 90 - 100 Euro).

MikroTik hEX

MikroTik hEX

Zugegeben, das Gehäuse wirkt im Vergleich zum ER-X etwas billig, es stört aber auch nicht. Ich habe jedenfalls noch niemanden gesehen, der Router wegen ihres Gehäuse-Designs kauft. Die Metallhülle des ER-X mag Hitze besser ableiten, aber da beide Geräte nicht sonderlich heiß werden, spielt das eine untergeordnete Rolle.

Die Ports lassen sich genauso frei konfigurieren wie bei der Konkurrenz. Selbst Port Mirroring in Hardware ist möglich, was meines Wissens nach aktuell beim ER-X nur via Software geht.

Zusammen mit dem hEX kommt eine Lizenz für RouterOS, MikroTiks Gegenstück zu EdgeOS. Es kann allerdings auch separat lizenziert und auf x86-Hardware betrieben werden. Wer sich das Web-Interface (WebFig) vorab ansehen möchte, kann das hier tun.

Der hEX kommt wird vorkonfiguriert geliefert: WAN liegt auf Port 1, die restlichen Ports sind dem Switch zugeordnet. Ein DHCP-Server, DNS-Forwarding usw. sind bereits eingerichtet. Assistenten für andere Konfigurationen gibt es aber nicht. wenn lieber selbst Hand anlegen möchte, besteht beim ersten Login die Möglichkeit einfach per Klick alle vordefinierten Einstellungen zurückzusetzen.

WebFig ist standardmäßig an LAN-Port 2 über die IP-Adresse 192.168.88.1 erreichbar. Alternativ bietet MikroTik mit WinBox ein Windows-Programm, das wie eine Art Wrapper für WebFig aussieht, sich aber durch Fenster-Unterstützung innerhalb der Software besser und schneller bedienen lässt. Für Mac-User gibt es WinBox inkl. Wine als fertiges Bundle – funktioniert bei mir bisher probemlos.

Im Gegensatz zum Web-Interface von EdgeOS kann WebFig alle Funktionen konfigurieren. Über einen Paket-Manager lassen sich außerdem weitere Möglichkeiten nachrüsten, u.A. IPv6, das als inaktives Paket mitgeliefert wird.

Die Oberfläche erschlägt einen auf den ersten Blick durch die vielen Optionen und ist etwas gewöhnungsbedürftig, wenn man vorher nur mit EdgeOS zu tun hatte. Nach ein paar Problemen komme ich aber mit WebFig ziemlich gut klar. Die grundsätzlichen Vorgänge unterscheiden sich ja nicht. Umgekehrt ist sicherlich auch EdgeOS für einen MikroTik-Nutzer erstmal sehr ungewohnt.

Das CLI von RouterOS ist ebenso so logisch und einfach strukturiert wie in EdgeOS, auch wenn natürlich die Syntax anders aussieht. Änderungen sind im Gegensatz zu EdgeOS sofort aktiv und werden direkt gespeichert. Um Probleme zu verhindern, bietet RouterOS den Safe Mode für das CLI und WebFig. Darin gemachte Änderungen werden auch sofort umgesetzt, aber erst gespeichert, wenn man das entsprechende Kommando gibt. Im Zweifelsfall reicht ein Neustart und nichts ist passiert.

In Sachen Hardware-Beschleunigung zeigt sich der hEX knausriger als der ER-X, da aktuell nur IPsec unterstützt wird. Ob da weitere Planungen anstehen, konnte ich leider nicht in Erfahrung bringen. Bleibt die Frage, ob das überhaupt geht? Offiziell unterstützt der SoC beider Geräte nur Hardware-IPsec. Es ist also wahrscheinlich, dass der ER-X zusätzliche Hardware für NAT und DPI besitzt.

Benchmark

Mein Benchmark-Szenario basiert auf iPerf3 mit einer, zehn und 100 gleichzeitigen TCP-Verbindungen und ist damit eher theoretischer Natur. Einen ausgefeilten Test mit zigtausenden HTTP-Downloads in verschiedenen Größen wie Ars Technica kann ich leider derzeit nicht bieten. Vielleicht sollte ich “routerperf” entwickeln. :D

Der Benchmark fand zwischen meinem PC und dem MacBook Pro statt. Der Windows-Rechner verfügt über eine Intel-LAN-Schnittstelle, während der Mac über einen Thunderbolt-Ethernet-Adapter mit dem LAN verbunden war. Sind also beides keine Krücken.

Als Referenzwerte dienen Durchläufe an beiden Rechnern, die über einen Cisco SoHo-Switch verbunden waren.

In allen anderen Szenarien war der Mac als Server am WAN-Port des jeweiligen Routers und der PC am entsprechenden LAN-Port in einem separaten Netz. Das NAT findet via Masquerading in IPTables statt.

Ergebnis

Benchmark Results

Das Hardware-NAT des ER-X schlägt richtig ein, während die Leistung ohne Hardware-Unterstützung ungewöhnlich inkonsistent ist. Das volle Potenzial wird erst mit mehreren Verbindungen wirklich genutzt. Der hEX dagegen skaliert in dieser Situation wie man es erwartet.

Da beide die gleiche CPU verwenden ist das Ergebnis bei nur einer Verbindung umso erstaunlicher. Es wäre durchaus möglich, dass es sich hier um einen Bug handelt. Ein ähnliches Problem gab es im Sommer mit dem UniFi Security Gateway, das auf der Hardware des EdgeRouter Lite basiert.

In der Realität dürfte die Differenz zwischen dem hEX und ER-X ein Stück kleiner ausfallen, denn nicht jede Verbindung läuft über TCP und die Paketgröße hat hier auch ein Stück mitzureden.

Fazit

Ich bin mit beiden Geräten sehr zufrieden. Für knapp 60 Euro bekommt man in beiden Fällen ein überzeugendes Produkt, das auch gehobenen Ansprüchen im Heimnetz mehr als gerecht wird.

Nur wer sich glücklich schätzen kann eine Gigabit-Internetverbindung zu besitzen, dürfte mit dem ER-X die schlauere Wahl treffen – auch wenn in der Realität der Unterschied geringer ausfallen wird. Ganz nebenbei: der hEX hat natürlich auch größere Brüder.

Letztendlich dürfte es für die meisten von uns eine reine Geschmacksfrage sein. Ich werde beide im Wechsel einsetzen und die Entwicklung beobachten. Da beide praktischerweise 24 V Passive PoE unterstützen, lassen sie sich sehr einfach tauschen. Kabel bei einem abstecken, beim anderen anstecken – fertig.